What can we help you with?
Rules
Rules pair triggers and actions to generate automated responses. Form rules are evaluated during creation and updates performed manually, by workflow, or by data import.
Create a rule
- Locate the form type and select the “Edit” button for the desired form type.
- Select “Add” in the “Rules” section.
- Populate the fields. Data fields with an asterisk (*) are required.
- Name*: Enter the name of the rule.
- Precedence*: Enter the order of this rule in relation to the other rules. Rules will execute in the order specified. If no order is specified, rules will automatically increment by 5.
- Enabled: Whether the rule will be applied to the form. Rules are enabled by default.
- Debug Mode: Toggle on to activate the “debugging” mode to log evaluation information to the browser console to assist with troubleshooting issues.
- Please toggle off when your form is complete. Please see the section below on Debug Mode for additional information on how to use this functionality.
- Comments: Enter any comments you would like to store for this rule.
- Select “Save” upon completion.
Debug Mode
The debug mode toggle is designed to assist with troubleshooting form rule logic. Follow these steps to use this tool.
- Toggle on the Debug Mode for one or more form rules and save the form rules.
- In the main menu, under Forms, select New to create a new form.
- Select the form type you’d like to debug.
- Right-click on the form and select ‘Inspect’ (in Chrome or Microsoft Edge) or ‘Inspect Element’ (in Firefox) from the drop-down menu.
- Select the ‘Console’ tab.
- As you enter data into your form, the debugging information will write to the Console tab as rules are evaluated. The information provided may help inform where rules are failing.
Please contact Assetas if you have questions regarding the use of Debug Mode.
Manage rules
- Locate the form type and select the “Edit” button for the desired form type.
- Select the appropriate option for managing your rules within the “Rules” section:
- Edit this rule.
- Copy this rule.
- Delete this rule and all associated logic.
Triggers
Triggers capture the preceding event(s) of any rule that initiates the action.
Create a trigger
- Locate the form type and select the “Edit” button for the desired form type.
- Locate the appropriate rule in the “Rules” section
- Select “Add” in the “Trigger” section.
- Populate the fields. Data fields with an asterisk (*) are required.
- Group*: Select the group of this trigger. Groups are used in conjunction with logical statements where the entire group evaluates to true or false.
- If an OR statement will be included in the logic, the Group value defines the order of operations. Use additional groupings to ensure the filtering logic works as expected.
- If the logic does not use OR statements (the logic only uses AND statements), or there is only a single filter, Group 1 will be sufficient.
- For example, if your logic looks something like (A and B and C) OR (D and E), the filter elements within the first set of parenthesis will be in Group 1, and the filter elements within the second set of parenthesis will be in Group 2.
- Precedence*: Enter the order of this trigger in relation to the other triggers within the group.
- When adding, editing, and deleting a trigger, the system will automatically renumber the triggers by increments of 5.
- Trigger Type*: Select the type of trigger to perform. Options include:
- After Form Submit
- The “New Form” and “Form Open” triggers may be combined using “OR” logic when paired with the “After Form Submit” trigger.
- This trigger evaluates to “true” ONLY when the form is submitted, and not when it is saved as a draft.
- “Answer Changed” and “Answer Comparison” triggers may be paired with AND logic.
- The Run Delay option allows the user to specify the number of minutes to delay the running of the rule evaluation after the form is submitted. Leave this field blank to run the trigger immediately upon form submit.
- Use caution when combining this trigger with an “ELSE” action. This trigger will evaluate as FALSE at several points prior to form submit, which will result in ELSE actions being executed.
- Answer Changed
- If an answer is changed from null to something else, and then back to null, the Answer Changed trigger to evaluate to true.
- Answer Comparison
- The comparison is not case sensitive. For example, if the answer to a question is “Yes” and it is being evaluated against the value “yes”, this comparison will evaluate to True.
- The Answer Comparison trigger can also be used to compare against the presence or lack of an attachment for questions with the Attachment or Photo datatype. Use the “is blank” or “is not blank” operator.
- If the Form Answer is a dropdown list, and the operator of the Answer Comparison is “equals”, the Value field of the trigger must be a GUID rather than text. For readability, Assetas recommends using variables where possible to pull back the GUID rather than entering the GUID into the Value field.
- If the Form Answer is a Selection List, please select the Selection List Comparison Value. This allows you to compare on the Selection List value, group, or any of the data fields in columns 1-5 of the Selection List.
- Before Form Save
- The “New Form” and “Form Open” triggers may be combined using “OR” logic when paired with the “Before Form Save” trigger.
- “Answer Changed” and “Answer Comparison” triggers may be added with AND logic.
- This trigger evaluates to “true” just before the form is submitted or saved as a draft.
- Use caution when combining this trigger with an “ELSE” action. This trigger will evaluate as FALSE at several points prior to form save, which will result in ELSE actions being executed.
- Form Open
- This trigger initiates when an existing form is opened for edit. To trigger upon the action of creating a new form, use the ‘New Form’ trigger.
- The “Before Form Save” and “After Form Save” triggers may be paired with “OR” logic when combined with the “Form Open” trigger.
- The “Form Open” trigger is mutually exclusive to the “New Form” trigger.
- Use caution when combining this trigger with an “ELSE” action. This trigger will evaluate as FALSE at several points after form save, which will result in ELSE actions being executed.
- New Form
- This trigger initiates when a new form is initially opened for creation.
- The “Before Form Save” and “After Form Save” triggers may be paired with “OR” logic when combined with the “New Form” trigger.
- The “New Form” trigger is mutually exclusive to the “Form Open” trigger.
- Use caution when combining this trigger with an “ELSE” action. This trigger will evaluate as FALSE at several points after form creation, which will result in ELSE actions being executed.
- User is Anonymous
- This trigger is available only when the form type allows for anonymous submittal in the Form Type Details section.
- After Form Submit
- Comments: The comments for the trigger.
- Logical*: Select the option to define how to relate this trigger to the other triggers.
- If the trigger directly after this trigger is in a different group, then the logical field will describe how the two groups interact.
- The AND statement has a higher precedence than the OR statement. See the table below for examples.
- A OR B AND C MEANS A OR (B AND C)
- A AND B OR C AND D MEANS (A AND B) OR (C AND D)
- A AND B AND C OR D MEANS ((A AND B) AND C) OR D
- Group*: Select the group of this trigger. Groups are used in conjunction with logical statements where the entire group evaluates to true or false.
- Select “Save” upon completion.
Manage triggers
- Locate the form type and select the “Edit” button for the desired form type.
- Select the appropriate option for managing your triggers within the “Rules” section:
- Edit this trigger.
- Delete this trigger.
- When deleting a trigger, the system will automatically renumber the triggers by increments of 5.
Actions
Actions are configured to be processed as a group when the triggers are met (“If these triggers are true then perform these actions”), in addition to as a group when triggers are not met (“Else perform these actions”). Specific actions are available based on the trigger(s) selected.
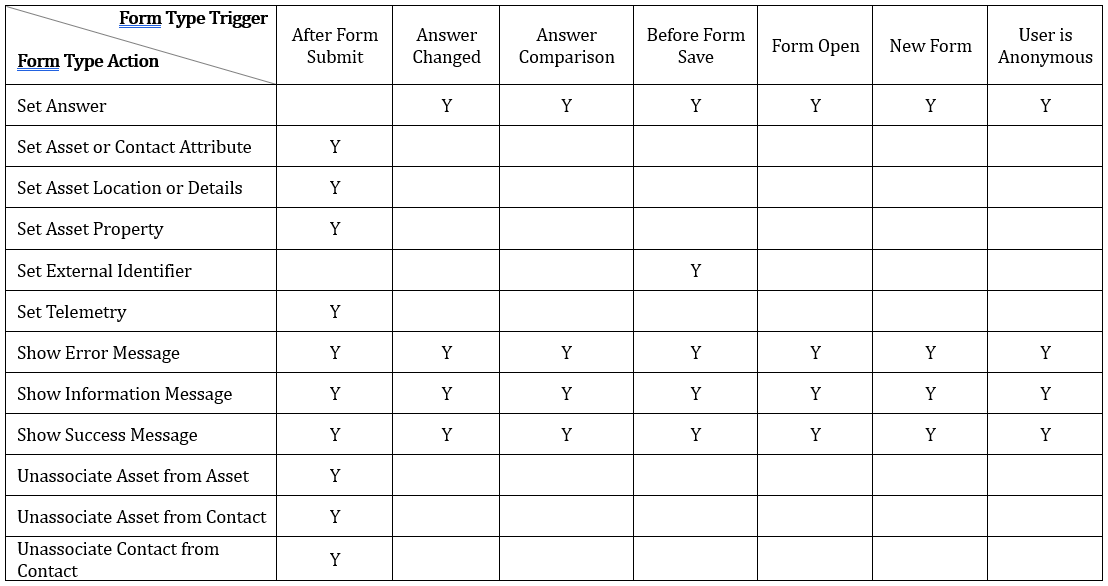
Trigger / action matrix
The available actions are dependent upon which triggers are saved.

Create an action
- Locate the form type and select the “Edit” button for the desired form type.
- Locate the appropriate rule in the “Rules” section
- Select “Add” in the “Action” section.
- On the next page, populate the fields based on the action selected. Data fields with an asterisk (*) are required.
- Select “Save” upon completion.
Add or Remove Form Tag
Add a new form tag or removes an existing form tag when the rule triggers are met. This action must be paired with a “Before Form Save”, “Form Open”, or “New Form” trigger.
Create multiple actions when adding or removing multiple tags.
- Precedence*: Enter the order of this action in relation to the other actions. Actions will execute in the order specified.
- When adding, editing, and deleting an action, the system will automatically renumber the actions by increments of 5.
- Action Type*: Select the type of action to perform. Select “Add Form Tag” or “Remove Form Tag”.
- Value*: Enter the value to use for this action.
- Create Corresponding “Remove” or “Add” Action: Toggle on to create the corresponding action.
- For example, choose to create the corresponding action to complete the reverse when the criteria are not met.
- This field is visible upon creation and hidden when the record is edited. It is defaulted to be selected.
Associate Asset to Asset
The Associate Asset to Asset action adds a new asset to asset association or replaces an existing asset to asset association when the rule triggers are met. This action must be paired with an “After Form Submit” trigger.
- Precedence*: Enter the order of this action in relation to the other actions. Actions will execute in the order specified.
- When adding, editing, and deleting an action, the system will automatically renumber the actions by increments of 5.
- Action Type*: Select the type of action to perform. Select “Associate Asset to Asset”.
- Asset*: The primary or parent asset to associate. You can insert a GUID or a variable.
- Association Type*: The association type of the linked assets.
- Secondary Asset*: The secondary or child asset to associate. You can insert a GUID or a variable.
- Replace Existing Association: Toggle on if the new association replaces one of the same association type.
Associate Asset to Contact
The Associate Asset to Contact action adds a new asset to contact association when the rule triggers are met. This action must be paired with an “After Form Submit” trigger.
- Precedence*: Enter the order of this action in relation to the other actions. Actions will execute in the order specified.
- When adding, editing, and deleting an action, the system will automatically renumber the actions by increments of 5.
- Action Type*: Select the type of action to perform. Select “Associate Asset to Contact”.
- Asset*: The asset to associate. You can insert a GUID or a variable.
- Role*: The role of the contact at the asset.
- Contact*: The contact to associate. You can insert a GUID or a variable.
Associate Asset to Document
The Associate Asset to Document action adds a new asset to document association when the rule triggers are met. This action must be paired with an “After Form Submit” trigger.
- Precedence*: Enter the order of this action in relation to the other actions. Actions will execute in the order specified.
- When adding, editing, and deleting an action, the system will automatically renumber the actions by increments of 5.
- Action Type*: Select the type of action to perform. Select “Associate Asset to Document”.
- Asset*: The asset to associate. You can insert a GUID or a variable.
- Document*: The Document to associate. You can insert a GUID or a variable.
Associate Asset to Form
The Associate Asset to Form action adds a new asset to form association when the rule triggers are met. This action must be paired with an “After Form Submit” trigger.
- Precedence*: Enter the order of this action in relation to the other actions. Actions will execute in the order specified.
- When adding, editing, and deleting an action, the system will automatically renumber the actions by increments of 5.
- Action Type*: Select the type of action to perform. Select “Associate Asset to Form”.
- Asset*: The asset(s) to associate. You can insert a GUID or a variable. If a variable applies to multiple assets, all will be associated to the form.
- Form*: The form to associate. You can insert a GUID or a variable.
Associate Asset to Task
The Associate Asset to Task action adds a new asset to task association when the rule triggers are met. This action must be paired with an “After Form Submit” trigger.
- Precedence*: Enter the order of this action in relation to the other actions. Actions will execute in the order specified.
- When adding, editing, and deleting an action, the system will automatically renumber the actions by increments of 5.
- Action Type*: Select the type of action to perform. Select “Associate Asset to Task”.
- Asset*: The asset to associate. You can insert a GUID or a variable.
- Task*: The task to associate. You can insert a GUID or a variable.
Associate Contact to Contact
The Associate Contact to Contact action adds a new contact to contact association when the rule triggers are met. This action must be paired with an “After Form Submit” trigger.
- Precedence*: Enter the order of this action in relation to the other actions. Actions will execute in the order specified.
- When adding, editing, and deleting an action, the system will automatically renumber the actions by increments of 5.
- Action Type*: Select the type of action to perform. Select “Associate Contact to Contact”.
- Contact*: The primary or parent contact to associate. You can insert a GUID or a variable.
- Association Type*: The association type of the linked assets.
- Secondary Contact*: The secondary or child contact to associate. You can insert a GUID or a variable.
Copy Asset
The Copy Asset action duplicates an existing asset when an asset is matched in the “Source Asset” field. There are two flavors of this rule:
Copy Asset: Creates a new asset with similar information to the source. During setup, you can choose which asset-specific records to carry over (for example Attributes, Properties, Calculations, and more). You can edit the copied asset details as needed.
Transfer / Move: Creates a new record to allow the history when equipment is moved or replaced. You will be prompted to update both: the New Asset (the asset being created), and the Source Asset (the original asset being copied), so the system correctly reflects the change over time.
Transfer / Move does not “move” the same asset record or create a true historical version of that record. Instead, it creates a brand-new asset record at the destination you provide. Creating a new record allows you to preserve the old record as a historical “ghost” at the original location while the new asset represents the equipment in its new location. This approach helps keep location-specific history intact (for example: telemetry, work history, inspections, and other records tied to that location and time period).
NOTE: The “Copy” action will not copy the GUID, external id, or tracking code. If the external id or tracking code fields match an existing asset, no asset will be created.
- Precedence*: Enter the order of this action in relation to the other actions. Actions will execute in the order specified.
- When adding, editing, and deleting an action, the system will automatically renumber the actions by increments of 5.
- Source Asset: The source asset to copy.
- Type*: If this is a simple asset copy or a transfer, where the asset is moving to a new location and we want to keep the historic data at the old location.
New Asset
- Parent Asset: Sets the “is the physical location of” parent association of the new asset. Leave this blank to not associate the new asset to a parent.
- Name: The name of the new asset. Leave this blank to use the value of the source asset.
- Description: The description of the new asset. Leave this blank to use the value of the source asset.
- Status: Sets the status of the New Asset. Leave this blank to leave the status unchanged.
- In-Service Date: The In-Service date to use for the new asset.
Note: The date the asset itself became active or placed into service. This should be aligned to the source asset if the “Move / Transfer” Type is selected. - Retired Date: The Retired date to use for the new asset.
- Location In-Service Date: The Location In-Service date to use for the new asset.
Note: Location dates are intended as a dates to show the start and end date that the asset became associated with this location. If using “Move / Transfer” this will likely be a transfer date from the form. - Location Retired Date: The Location Retired date to use for the new asset.
- Serial Number: The serial number of the new asset. If left blank, it will not copy the value from the source asset.
- Tracking Code: The tracking code of the new asset. If left blank, it will not copy the value from the source asset.
- Note: If this field matches an existing tracking code the asset will not be created.
- Comments: The comments of the new asset. Leave this blank to use the value of the source asset.
- External ID: The external identifier to set for the new asset. If blank, it will not copy the value from the source asset.
Note: If the external identifier matches an existing asset, the new asset record will not be created.
In most transfer scenarios, it is recommended to copy the external id from the source asest so telemetry and integrations properly route to this “New” active asset. You can use the Source Asset’s External ID by inputting the {Asset.ExternalID:<>} variable and changing the external ID of the Source Asset’s external id in the “Source Asset Changes” section to ensure they no longer match. - Photo: The form question to use to set the photo of the new asset. Leave this blank to use the value of the source asset.
- Location: The form question to use to set the location of the new asset.
- Copy Attributes: If the source attributes are copied to the new asset.
- Copy Properties: If the active source properties are copied to the new asset.
- Copy Calculations: If the active source calculations are copied to the new asset.
- Copy Depreciation: If the source depreciation is copied to the new asset.
- Copy Asset Associations: If the source asset associations are also associated to the new asset. The physical location types are not copied.
- Copy Telemetry Tags: If the source telemetry tags are copied to the new asset.
- Copy Analyses: If the source asset analyses are also associated to the new asset.
- Copy Addresses: If the source asset addresses are copied to the new asset.
- Copy Locations: If the source asset locations are copied to the new asset.
- Copy Correspondence: If the source asset correspondences are copied to the new asset.
- Copy Contact Associations: If the source contacts are also associated to the new asset.
- Copy Document Associations: If the source documents are also associated to the new asset.
Source Asset (Hidden unless “Transfer / Move” is selected as the Type)
- Name: Updates the name of the source asset. Leave this blank to leave the value unchanged.
- Source Status: Sets the status of the source Asset. Leave this blank to leave the status unchanged.
- In-Service Date: The In-Service date to set for the source asset. Leave this blank to leave the value unchanged.
- Retired Date: The Retired date to set for the source asset. Leave this blank to leave the value unchanged.
- Location In-Service Date: The Location In-Service date to set for the source asset. Leave this blank to leave the value unchanged.
- Location Retired Date: The Location Retired date to use for the new asset. Leave this blank to leave the value unchanged.
- External ID: The External Identifier to set for the source asset. If blank, it will not copy the value from the source asset.
- Truncate Property Dates: If the property dates for the source equipment are adjusted to be within the Location In-Service and Location Retired Dates
- Associate Source and New Asset: The association type to use when linking the new asset to the source asset. Leave this blank if you do not want to associate the assets.
- Swap Association Position: (Only revealed if Transfer is toggled on): If you wish to swap the position of the parent and child asset in the association.
Create or Update Asset
The Create / Update Asset action generates a new asset or updates an existing asset when the rule triggers are met. This action must be paired with an “After Form Submit” trigger. This action will generate an asset whose External Identifier is the Rule Action’s GUID, unless the External Identifier is specific in the action.
- Precedence*: Enter the order of this action in relation to the other actions. Actions will execute in the order specified.
- When adding, editing, and deleting an action, the system will automatically renumber the actions by increments of 5.
- Action Type*: Enter the type of action to perform. Select “Create/Update Asset”.
- Asset Type*: Select the type of asset to create.
- Asset Status*: Select the status to set for the asset.
- Asset Name: The name to set for the asset. Use variables to make this name dynamic.
- Alternate Name: The alternate name to set for the asset.
- Description: The description to set for the asset.
- Serial Number: The serial number to set for the asset.
If this serial number matches an existing serial number of the same asset type, “_duplicate” will be appended to the created asset’s serial number. If there is already a duplicate, “_duplicate1”, “_duplicate2”, etc. will be appended as needed. - Parent Asset: The parent asset to set for the asset. Leave blank for none. Use variables to make this parent asset dynamic.
- Association Type: The association type of the parent asset. Leave blank for none. Be sure to specify a parent asset if using the association type field.
- Asset Identifier: The identifier of the asset to be created/updated for this action. Assetas recommends leaving this blank unless other rule action use this identifier to modify the asset. It is the user’s responsibility to set unique identifiers, and if an identifier is set here that matches an existing asset, the existing asset will be modified rather than creating a new asset.
- In-Service Date: The in-service date to set for the asset. Leave blank for none. Use variables to make this date dynamic.
- Retired Date: The retired date to set for the asset. Leave blank for none. Use variables to make this date dynamic.
- Location In-Service Date: The location in-service date to set for the asset. Leave blank for none. Use variables to make this date dynamic.
- Location Retired Date: The location retired date to set for the asset. Leave blank for none. Use variables to make this date dynamic.
- Photo: The question to get the photo for the asset from.
- Location: The question to get the location coordinates for the asset from. If there is no answer provided, the default datetime is the same that would show for {Today}.
- Location Type: The type of location to set for the asset.
- Location Date: The location date to set for the asset. Use variables to make this date dynamic.
- Add New Location: Whether to add a new location for this asset rather than updating the most recent one.
- Comments: The comments to set for the asset. Use variables to make this field dynamic.
- Overwrite Values: Toggle on to replace existing values. Toggle off to only replace blank values on any update. This is commonly set to ‘false’ to retain existing data and only add missing data.
- If updating an asset, Overwrite Values must be set to ‘true’.
- Attribute Type: Select an asset attribute to optionally set at the time of asset creation or update.
- Value: The value to set for the attribute. You may insert variables as needed.
- Actions – Delete: Clears this asset attribute type.
Create or Update Task
The Create or Update Task action generates a task or updates an existing task when the rule triggers are met. The “Create / Update Task” action will generate a Task whose External Identifier is the Rule Action’s GUID. This action must be paired with an “After Form Submit” trigger.
- Precedence*: Enter the order of this action in relation to the other actions. Actions will execute in the order specified.
- When adding, editing, and deleting an action, the system will automatically renumber the actions by increments of 5.
- Action Type*: Enter the type of action to perform. Select “Create Task” or “Update Task”.
- Task Assignees*: Enter the list of email addresses, contact identifiers, or form answers (that contain a contact as an answer) that will be assigned to the task (and that will receive task-related emails). Separate multiple recipients with a semicolon. You may append variables to create a dynamic recipients list.
- Task Summary*: Enter the summary to use for the task and for the subject line of any related emails. You may append variables to make the subject dynamic.
- The Answer variable will format dates as YYYY-MM-DD HH:MM:SS.
- Task Description*: Enter the text to use for the task details and for the body of any related emails. You may append variables to make this information dynamic.
- This field does not support bulleted lists.
- The Answer variable will format dates as YYYY-MM-DD HH:MM:SS.
- Task Type*: Select the type of task to create.
- Task Priority*: Select the priority to set for the task.
- Task Status*: Select the status to set for the task.
- Due Date: Select the due date to set for the task. Leave blank for none. Use variables to make this date dynamic.
- Start Date: Select the start date to set for the task. Leave blank for none. Use variables to make this date dynamic.
- Close Date: Select the close date to set for the task. Leave blank for none. Use variables to make this date dynamic.
- If updating a task to automatically set a close date, best practice is to set a close date equal to a date question within the form, rather than today’s date. This allows the task close date to reflect the date the work was completed.
- Tags: The list of tags to be associated with this record.
- Associated Assets: Enter the list of asset identifiers, or form answers (that contain an asset as an answer) that are associated with this task. Separate multiple assets with a semicolon. Leave blank for none. Use variables to make the associated assets dynamic.
- Photo: The question that contains the image(s) to associate to the generated task.
- New Form Type to Launch from Task: The type of form to launch from the task. Users will see a link within the task to create a new form of this type. You must save the action first, then reopen it to see these fields.
- Question: The form question to answer.
- Value: The value to set for the question. Use variables to carry over values from the current form into the new form.
- Actions – Delete: Clears this form question.
- Task Identifier: Enter the identifier of the task to be created/updated for this action. You must specify different identifiers if multiple tasks can be created for this form.
- Email on New Task: Toggle on to send an email to the assignees when a new task is created by this rule.
- Note, if assets associated to the form have a profile photo, the photo will be included in the task email.
- Email on Task Updates: Toggle on to send an email to the assignees when an existing task is updated by this rule.
- Overwrite Values: Toggle on to replace existing values. Toggle off to only replace blank values on any update. This is commonly set to ‘false’ to retain existing data and only add missing data.
- If updating a task, Overwrite Values must be set to ‘true’.
- Attribute Type: Select a task attribute to optionally set at the time of task creation or update.
- Value: The value to set for the attribute. You may insert variables as needed.
- Actions – Delete: Clears this task attribute type.
Hide or Show Question
The Hide or Show Question actions control the question’s visibility in the form when the rule triggers are met or evaluate to true. This action must be paired with an “Answer Changed”, “Answer Comparison”, “Form Open”, “New Form”, or “User is Anonymous” trigger.
The “Hide Question” action should be paired with a “Set Answer” action (where Value = {Blank}), except in cases where “Hide Question” is being used for form security. This pairing of “Hide Question” and “Set Answer” (where Value = {Blank}) actions prevents the situation where originally populated data is hidden and then unintentionally submitted to the database.
- Precedence*: Enter the order of this action in relation to the other actions. Actions will execute in the order specified.
- When adding, editing, and deleting an action, the system will automatically renumber the actions by increments of 5.
- Action Type*: Select the type of action to perform. Select “Hide Question” or “Show Question”.
- Question*: Select the question you would like to control when the rule trigger evaluates to true. Typically, this action is paired with an Answer Comparison rule trigger.
- Create Corresponding Action: Toggle on to create the corresponding action.
- For example, choose to create the corresponding action to complete the reverse when the criteria are not met.
- This field is visible upon creation and hidden when the record is edited. It is defaulted to be selected.
Hide or Show Section
The Hide or Show Section actions control the form section’s visibility when the rule triggers are met or evaluate to true. This action must be paired with an “Answer Changed”, “Answer Comparison”, “Form Open”, “New Form”, or “User is Anonymous” trigger.
The “Hide Section” action should be paired with a “Set Answer” action (where Value = {Blank}), except in cases where “Hide Section” is being used for form security. This pairing of “Hide Section ” and “Set Answer” (where Value = {Blank}) actions prevents the situation where originally populated data is hidden and then unintentionally submitted to the database.
- Precedence*: Enter the order of this action in relation to the other actions. Actions will execute in the order specified.
- When adding, editing, and deleting an action, the system will automatically renumber the actions by increments of 5.
- Action Type*: Select the type of action to perform. Select “Hide Section” or “Show Section”.
- Section*: Select the section you would like to control when the rule trigger evaluates to true. Typically, this action is paired with an Answer Comparison rule trigger.
- Create Corresponding Action: Toggle on to create the corresponding action.
- For example, choose to create the corresponding action to complete the reverse when the criteria are not met.
- This field is visible upon creation and hidden when the record is edited. It is defaulted to be selected.
Lock Form
The Lock Form action locks the form and prevents further edits when the rule triggers are met. This action must be paired with an “After Form Submit” trigger.
After a form is locked, URL links to the Edit screen of the form will redirect to the Form Details page and display an error message indicating that the form is locked and cannot be edited.
- Precedence*: Enter the order of this action in relation to the other actions. Actions will execute in the order specified.
- When adding, editing, and deleting an action, the system will automatically renumber the actions by increments of 5.
- Action Type*: Select the type of action to perform. Select “Lock Form”.
Prevent Form Save
The Prevent Form Save action does not allow the user to save the form when the rule triggers are met. This action must be paired with a “Before Form Save” trigger. We recommend pairing this action with a trigger defining why a form should not save and an action to “Show Error Message” providing information to the user on how to resolve.
- Precedence*: Enter the order of this action in relation to the other actions. Actions will execute in the order specified.
- When adding, editing, and deleting an action, the system will automatically renumber the actions by increments of 5.
- Action Type*: Select the type of action to perform. Select “Prevent Form Save”.
Run Workflow
The Run Workflow action triggers a designated workflow to be immediately executed. This action must be paired with the “After Submit” trigger. If the trigger includes a form question with repeating answers, the workflow will be run separately for each answer that meets the criteria.
- Action Type*: Select the type of action to perform. Select “Run Workflow”.
- Workflow: Select the workflow to run.
Send Email
The Send Email action sends an email when the rule triggers are met. This action must be paired with an “After Form Submit” trigger. If the trigger includes a form question with repeating answers, an email will be sent separately for each answer that meets the criteria.
The resulting email will include a link to view the form in the system.
- Precedence*: Enter the order of this action in relation to the other actions. Actions will execute in the order specified.
- When adding, editing, and deleting an action, the system will automatically renumber the actions by increments of 5.
- Action Type*: Select the type of action to perform. Select “Send Email”.
- Email Recipients*: Enter the list of email addresses, contact identifiers, or form answers (that contain a contact as an answer) that will receive the email. Separate multiple recipients with a semicolon (e.g., {FormAnswer:Form Question External Identifier}; email2@company.com). You may append variables to create a dynamic recipients list.
- Email Subject*: Enter the subject to use for the email. You may append variables to make the subject dynamic.
- Email Body*: Enter the body to use for the email, message, or task. You may append variables to make the body dynamic.
- Include Form: Toggle on to include the form’s answered questions, comments, and photos in the email.
- When selected, the form embedded in the email displays all questions for which there are answers, including applicable section headers, comments, and photos. Also, If assets associated to the form have a profile photo, the photo will be included in the email when ‘Include Form’ is toggled to ‘On’.
- Send Only on First Submit: Toggle on to send the email only on the initial submit, and not send the email any time someone edits and saves the form.
Send SMS
The Send SMS action sends an SMS message when the rule triggers are met. This action must be paired with an “After Form Submit” trigger.
Messages are sent from the number (844) 542-3501. SMS messages may only be sent to phone numbers in the United States. Local carrier rates apply to delivered messages.
- Precedence*: Enter the order of this action in relation to the other actions. Actions will execute in the order specified.
- When adding, editing, and deleting an action, the system will automatically renumber the actions by increments of 5.
- Action Type*: Select the type of action to perform. Select “Send SMS”.
- SMS Recipients*: Enter the list of phone numbers, contact identifiers, or form answers (that contain a contact as an answer) that will receive the SMS message.
- Messages are only sent to “Mobile” numbers that are marked as “Use” at the contact record. Separate multiple recipients with a semicolon (e.g., {FormAnswer:Form Question External Identifier}; email2@company.com).
- You may append variables to create a dynamic recipients list.
- Message*: Enter the content of the SMS message. You may append variables to make the subject dynamic.
Set As Draft
The Set As Draft action sets the form status to “Draft” when the rule triggers are met. This action must be paired with an “After Form Submit” trigger type. If used in a form that originates in Trek, the user that originates the form will NOT receive this form back in their draft forms after submittal. If the form is assigned to others pre/post submit, other users will still see the draft form.
- Precedence*: Enter the order of this action in relation to the other actions. Actions will execute in the order specified.
- When adding, editing, and deleting an action, the system will automatically renumber the actions by increments of 5.
- Action Type*: Select the type of action to perform. Select “Set As Draft”.
Set Answer
The Set Answer action sets the answer to an existing form question when the rule triggers are met. This action must be paired with an “Answer Changed”, “Answer Comparison”, “Before Form Save”, “Form Open”, “New Form”, or “User is Anonymous” trigger. Typically, this action is paired with a “Before Form Save” or a “Form Open” trigger.
Using any of the following variables in the “Value” field requires a “Before Form Save” trigger:
{Asset}
{AssetAddress}
{AssetAttribute}
{AssetContacts}
{Asset.AlternateName}
{Contact}
{ContactAddress}
{ContactAttribute}
{ContactEmail}
{ContactPhone}
{Evaluate}
{ManagerOf}
{NewFormLink}
{ShortURL}
- Precedence*: Enter the order of this action in relation to the other actions. Actions will execute in the order specified.
- When adding, editing, and deleting an action, the system will automatically renumber the actions by increments of 5.
- Action Type*: Select the type of action to perform. Select “Set Answer”.
- Question*: Select the question where the answer will be set.
- Value*: Enter the value to set for the question identified above. You may append variables to make the value dynamic.
- If you use the {CurrentUser} variable to set an answer, the Data Type of the question where the answer is being set needs to be a Dropdown List with the List specifying a Contact Selection List report. Otherwise, a 36-character GUID will display instead of the current user’s name.
- The {EVALUATE:} function may be used in this field. See the Evaluate page for examples of how to use this function.
- To set a repeating Contact question with multiple people, please provide a list of semicolon-separated GUIDs or you may use a variable that returns more than one contact record.
Set Asset Attribute
The Set Asset Attribute action sets the answer to an existing asset attribute type when the rule triggers are met. This action will set the attribute for each asset associated to the form, or for a specific asset, where the attribute type exists. This action must be paired with an “After Form Submit” trigger.
When setting an attribute for multiple assets in a repeating form question or section, the action will evaluate each row individually and set the corresponding attribute appropriately. For example, consider a repeating table section listing three assets [X], [Y], [Z] and their corresponding question values [1], [2], [3]. When a rule is developed to set the asset attribute as the answer to that question, the attributes will be set accordingly: asset [X] ~ attribute value [1], asset [Y] ~ attribute value [2], and asset [Z] ~ attribute value [3].
- Precedence*: Enter the order of this action in relation to the other actions. Actions will execute in the order specified.
- When adding, editing, and deleting an action, the system will automatically renumber the actions by increments of 5.
- Action Type*: Select the type of action to perform. Select “Set Asset Attribute”.
- Asset Attribute Type*: Select the asset attribute type where the answer will be set.
- Value: Enter the value to set for the asset attribute type identified above. You may append variables to make the value dynamic.
- If you use the {CurrentUser} variable to set an answer, the Data Type of the asset attribute type where the answer is being set needs to be a Dropdown List with the List specifying a Contact Selection List report. Otherwise, a 36-character GUID will display instead of the current user’s name.
- The {EVALUATE:} function may be used in this field. See the Evaluate page for examples of how to use this function.
- Note: If you map a form answer to an asset attribute using {FormAnswer:<>} and the form field is left blank, the asset attribute will be overwritten with a blank value. To prevent blanks from being pushed, add an Is Not Blank rule trigger for that field.
- Set Attribute For: Select ‘All Associated Assets’ to set the asset attribute for all assets associated to the form with that asset attribute. Select ‘Specific Asset’ to choose an individual asset at which to set the asset attribute.
- Question: If ‘Specific Asset’ is selected, choose the form question where that specific asset is set as the answer. This list will filter for questions that are linked to an asset.
Set Asset Location
The Set Asset Location action sets the coordinates of an asset when the rule triggers are met. This action will set the coordinates for each asset associated with the form. This action must be paired with an “After Form Submit” trigger.
- Precedence*: Enter the order of this action in relation to the other actions. Actions will execute in the order specified.
- When adding, editing, and deleting an action, the system will automatically renumber the actions by increments of 5.
- Action Type*: Select the type of action to perform. Select “Set Asset Location”.
- Location Type*: Select the location type where the coordinates will be set. Select either Center or Front.
- Value: Enter the coordinates to set for the asset location identified above. You may append variables to make the value dynamic.
- A common approach is to use the {FormAnswer:} variable which references a form question with a datatype of Coordinates.
- Set Attribute For: Select ‘All Associated Assets’ to set the asset location for all assets associated to the form with that asset location. Select ‘Specific Asset’ to choose an individual asset at which to set the asset location.
- Question: If ‘Specific Asset’ is selected, choose the form question where that specific asset is set as the answer. This list will filter for questions that are linked to an asset.
Set Asset Details
The Set Asset Details action sets the value of an asset detail item when the rule triggers are met. This action will set the detail item for each asset associated with the form. This action must be paired with an “After Form Submit” trigger.
- Precedence*: Enter the order of this action in relation to the other actions. Actions will execute in the order specified.
- When adding, editing, and deleting an action, the system will automatically renumber the actions by increments of 5.
- Action Type*: Select the type of action to perform. Select “Set Asset Details”.
- Item*: Select the asset detail item where the value will be set.
- Value: Enter the value to set for the asset detail item identified above. You may append variables to make the value dynamic. The {EVALUATE:} function may be used in this field. See the Evaluate page for examples of how to use this function.
- Set For*: Select whether the detail item should be set for all assets associated to the form or a specific asset associated to the form.
- Question: The form question that contains the specific asset that the detail item should be set for. This field only displays if the detail item is being set for a Specific Asset.
Set Asset Property
The Set Asset Property action creates an asset property when the rule triggers are met. This action will set the property for each asset associated to the form, or for a select asset. This action must be paired with an “After Form Submit” trigger.
- Precedence*: Enter the order of this action in relation to the other actions. Actions will execute in the order specified.
- When adding, editing, and deleting an action, the system will automatically renumber the actions by increments of 5.
- Action Type*: Select the type of action to perform. Select “Set Asset Property”.
- Property*: The type of property that is linked to this value.
- Active Date*: The date when this property applies.
- Inactive Date: The date this property no longer applies.
- Comments: Any comments you would like to store for this record.
- Value: Enter the value to set for the asset property identified above. You may append variables to make the value dynamic. The {EVALUATE:} function may be used in this field. See the Evaluate page for examples of how to use this function.
- Set For*: Select whether the property should be set for all assets associated to the form or a specific asset associated to the form.
- Question: The form question that contains the specific asset that the property should be set for. This field only displays if the detail item is being set for a Specific Asset.
Set Contact Attribute
The Set Contact Attribute action sets the answer to an existing contact attribute type when the rule triggers are met. This action will set the attribute for each contact associated with the form, or for a specific contact, where the attribute type exists. This action must be paired with an “After Form Submit” trigger.
- Precedence*: Enter the order of this action in relation to the other actions. Actions will execute in the order specified.
- When adding, editing, and deleting an action, the system will automatically renumber the actions by increments of 5.
- Action Type*: Select the type of action to perform. Select “Set Contact Attribute”.
- Asset Attribute Type*: Select the contact attribute type where the answer will be set.
- Value: Enter the value to set for the contact attribute type identified above. You may append variables to make the value dynamic.
- If you use the {CurrentUser} variable to set an answer, the Data Type of the asset attribute type where the answer is being set needs to be a Dropdown List with the List specifying a Contact Selection List report. Otherwise, a 36-character GUID will display instead of the current user’s name.
- The {EVALUATE:} function may be used in this field. See the Evaluate page for examples of how to use this function.
- Set Attribute For: Select ‘All Associated Contacts’ to set the contact attribute for all contacts associated to the form with that contact attribute. Select ‘Specific Contact’ to choose an individual contact at which to set the contact attribute.
- Question: If ‘Specific Contact’ is selected, choose the form question where that specific contact is set as the answer. This list filters for questions where the contact is linked.
Set External Identifier
The Set External Identifier action sets the form’s external identifier when the rule triggers are met. This action must be paired with a “Before Form Save” trigger and we recommend also pairing it with a “New Form” trigger so the external identifier is set once.
- Precedence*: Enter the order of this action in relation to the other actions. Actions will execute in the order specified.
- When adding, editing, and deleting an action, the system will automatically renumber the actions by increments of 5.
- Action Type*: Select the type of action to perform. Select “Set External Identifier”.
- Value: The value to use for the form’s external identifier.
Set Telemetry
The Set Telemetry action sets telemetry values at the associated asset when the rule triggers are met. This action will set telemetry for each asset associated with the form. You must have a linked asset (select the ‘Associate Form to Asset’ toggle) in at least one form question. This action must be paired with an “After Form Submit” trigger.
- Precedence*: Enter the order of this action in relation to the other actions. Actions will execute in the order specified.
- When adding, editing, and deleting an action, the system will automatically renumber the actions by increments of 5.
- Set For*: Whether to push telemetry to all assets associated to the form or to a specific asset referenced in a question.
- Question: The form question (asset) to push the telemetry to.
- Action Type*: Select the type of action to perform. Select “Set Telemetry”.
- Telemetry Type*: Select the telemetry type to use for the telemetry.
- Unit of Measure*: Select the unit of measure to use for the telemetry.
- Telemetry Tag: Enter the asset’s telemetry tag identifier to use for the telemetry.
- Active Date*: Select the active date to use for the telemetry.
- Inactive Date: Select the inactive date to use for the telemetry.
- Numeric Value: Enter the numeric value to use for the telemetry.
- Numeric Value Override: The overriding numeric value to use for the telemetry. Using this field will preserve the value in the Numeric Value field.
- The Numeric Value Override field will supersede the Numeric Value field when populated, in the Telemetry Search page.
- In Reports, the Final Numeric Value column will display the Numeric Value Override when present, and the Numeric Value when there isn’t an override.
- When using the Numeric Value Override field, it’s critical that reports use the Final Numeric Value column rather than the Numeric Value column.
- Text Value: Enter the text value to use for the telemetry.
- Text Value Override: The overriding text value to use for the telemetry. Using this field will preserve the value in the Text Value field.
- The Text Value Override field will supersede the Text Value field when populated, in the Telemetry Search page.
- In Reports, the Final Text Value column will display the Text Value Override when present, and the Text Value when there isn’t an override.
- When using the Text Value Override field, it’s critical that reports use the Final Text Value column rather than the Text Value column.
- Estimated: Toggle on to indicate that the telemetry is estimated.
- Invalid: Toggle on to indicate that the telemetry is invalid.
- Locked: Toggle on to indicate that the telemetry is locked.
- Allow Locked Updates: Toggle on if you want to update the telemetry information even if the telemetry record is locked.
- Collection Date: Select the collection date to use for the telemetry. If no date is set, the collected date will default to the date the form was submitted.
- Suppress UTC Conversion: Toggle on if the given active, inactive, and collection dates are already in UTC. Toggle off to convert to UTC using the user’s time zone.
- Duplicate Days: The number of days to duplicate the telemetry record. This will set the same numeric or text value for the desired number of days, starting with the active date specified. If using form answers of a start date and an end date to calculate the number of days, use the following formula:
{EVALUATE:(ToDateTime(“{FormAnswer:End}”) – ToDateTime(“{FormAnswer:Start}”)).TotalDays} - Comments: Enter the comments to use for the telemetry.
Show Error Message
The Show Error Message action displays an error message when the rule triggers are met. This action can be used with any trigger and is often paired with a “Before Form Save” or an “Answer Comparison” trigger.
- Precedence*: Enter the order of this action in relation to the other actions. Actions will execute in the order specified.
- When adding, editing, and deleting an action, the system will automatically renumber the actions by increments of 5.
- Action Type*: Select the type of action to perform. Select “Show Error Message”.
- Message Title*: Enter the title to use for the message. You may append variables to make the title dynamic.
- Message Body*: Enter the body to use for the message. You may append variables to make the body dynamic.
Show Information Message
The Show Information Message action displays an information message when the rule triggers are met. This action can be used with any trigger and is often paired with a “Before Form Save” or an “Answer Comparison” trigger.
- Precedence*: Enter the order of this action in relation to the other actions. Actions will execute in the order specified.
- When adding, editing, and deleting an action, the system will automatically renumber the actions by increments of 5.
- Action Type*: Select the type of action to perform. Select “Show Informational Message”.
- Message Title*: Enter the title to use for the message. You may append variables to make the title dynamic.
- Message Body*: Enter the body to use for the message. You may append variables to make the body dynamic.
Show Success Message
The Show Success Message action displays an information message when the rule triggers are met. This action can be used with any trigger and is often paired with a “Before Form Save” or an “Answer Comparison” trigger.
- Precedence*: Enter the order of this action in relation to the other actions. Actions will execute in the order specified.
- When adding, editing, and deleting an action, the system will automatically renumber the actions by increments of 5.
- Action Type*: Select the type of action to perform. Select “Show Success Message”.
- Message Title*: Enter the title to use for the message. You may append variables to make the title dynamic.
- Message Body*: Enter the body to use for the message. You may append variables to make the body dynamic.
Unassociate Asset From Asset
The Unassociate Asset From Asset rule action removes the association between two asset records when the rule triggers are met. This action must be paired with the “After Form Submit” trigger.
- Primary Asset: The primary asset in the association.
- Association Type: The association type of the linked assets.
- Secondary Asset: The secondary asset in the association.
Unassociate Asset From Contact
The Unassociate Asset From Contact rule action removes the association between an asset record and a contact record when the rule triggers are met. This action must be paired with the “After Form Submit” trigger.
- Asset: The asset in the association.
- Role: The association type of the linked assets.
- Contact: The contact in the association.
Unassociate Contact From Contact
The Unassociate Contact From Contact rule action removes the association between two contact records when the rule triggers are met. This action must be paired with the “After Form Submit” trigger.
- Primary Contact: The primary contact in the association.
- Association Type: The association type of the linked contacts.
- Secondary Contact: The secondary contact in the association.
Manage actions
Once actions have been created, manage these records to maintain accurate information.
- Locate the form type and select the “Edit” button for the desired form type.
- Select the appropriate option for managing your actions within the “Rules” section:
- Edit this action.
- Delete this action.
Security
Grant security to security role or contact role
- Locate the form type and select the “Edit” button for the desired form type.
- Select “Add” in the “Security” section.
- Populate the fields. Data fields with an asterisk (*) are required.
- Group Type*: The security role or contact group.
- Security Role*: The security role who users are granted access to this form type.
- This field is only visible when “Group Type” is “Security Role”.
- Contact Group*: The contact group whose members are granted access to this form type.
- This field is only visible when “Group Type” is “Contact Group”.
- View Any: Toggle on if users of this group are allowed to view any forms of this type.
- View Associated: Toggle on if users of this group are allowed to view the forms of this type to which they are associated.
- Add: Toggle on if users of this group are allowed to add new forms of this type.
- Edit: Toggle on if users of this group are allowed to edit the forms of this type.
- Delete: Toggle on if users of this group are allowed to delete forms of this type that were not automatically dispatched by Assetas. Deletion of dispatched forms is controlled by the Security Role settings.
- Administer: Toggle on if users of this group are allowed to administer (e.g., lock or unlock) forms of this type.
- Select “Grant” upon completion.
Grant security to yourself
- Locate the form type and select the “Edit” button for the desired form type.
- Select “Add Me” in the “Security” section to grant yourself access immediately.
Manage security
Once security has been assigned, manage these records to maintain accurate access.
- Locate the form type and select the “Edit” button for the desired form type.
- To the right of each record, under the Actions menu, you may:
- Edit this security assignment.
- Revoke the ability for this assignment to access this form type.
Translate Form
Translating a form type into another language will create a new form type that is an exact copy of the original form type with all the question and description text translated from English into the target language.
Form questions MUST have an external identifier assigned to be included in the translated form.
You may optionally have newly entered forms of this type automatically create a new corresponding form as the parent form type with its text answers translated back to English. The form question external identifiers in the parent and child form types MUST match for the questions to be translated back to English. If using this feature, Assetas strongly recommends removing most form rule logic aside from hide/show logic, as all rule logic will be triggered in both the target language AND corresponding English form upon submit.
Please also note the following when using the translate feature:
- Form questions using lists for dropdowns or radio buttons must have the list options in the ‘List Values’ field for them to be translated into another language. List options in the ‘List’ field will not be translated.
- For example, to use “Yes/No” radio buttons in a question, enter “Yes|No” in the List Values field in the English form. Upon translation, those values auto-translated and will appear as “Yes`Sí“|No`No“” in a translated form (in this case, Spanish). Assetas will auto-combine the list value with the appropriately translated corresponding display value.
- When translating back to English, draft forms in the target language do not create a corresponding English form. The translation back to English will only occur upon submit.
- Editing an original form type will auto-update the translated version(s) of the form type upon submit (updates are bi-directional). Please be patient as updates may take a minute or two.
- Editing and re-submitting a form in the target language will update the translated English form upon submit (updates are bi-directional). Please be patient as updates may take a minute or two.
- There is a quota for the number of form translations allowed per month. Translations will fail when the quota is exceeded and will resume the following month. This quote may be found in Account Settings.
When you select the option to translate a form into another language, please select the following:
- Target Language: the target language of the new form type.
- Translate to Parent Form Type: Toggle on to have every submitted form automatically translated back to the original form type. The form question external identifiers in the parent and child form types MUST match for the questions to be translated back to English.